 In typical 2020 fashion, I’m still DIY-ing everything, and hair removal is no exception. That said, some popular techniques like waxing can get...sticky. Luckily, we have options. Threading, for one, is a great alternative for small areas, like the face.
Threading is a simple, one-tool technique that has been around for centuries and is extremely popular in southeast Asia and the Middle East. Essentially, threading utilizes a twisted thread to gently pull hair from the follicle.
While I swear by threaded eyebrows, they can get tricky. To thread eyebrows properly (and painlessly), you need to stretch the skin. This requires an extra set of hands—two to thread and one to stretch the skin. Unless you can enlist someone to help, start with smaller areas that require less precision, like the upper lip or chin. Keep in mind, if you go for the upper lip, you’ll still need to tighten the skin. Pushing your tongue against the area you’re threading with your mouth closed will do the trick—no extra hands required.
If you’re willing to give it a try, all you need is thread and a few minutes of your day. Remember to start small—it takes practice.
1. First, make sure the area you’re working with is clean. Use a wipe to remove any product or buildup.
2. Start with a piece of thread approximately around 10” long. You can experiment with the thread length and see what works best for you. I recommend using 100% cotton thread—your standard sewing thread that you probably already have sitting around your home.
3. Tie the ends of the thread into a knot to create a loop.

4. Hold the ends of the circle with your thumbs and forefingers (one hand on each side), forming a rectangle.

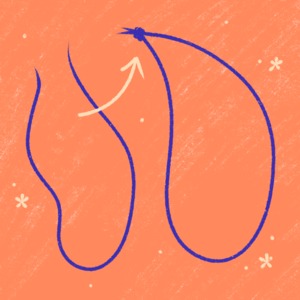
5. Twist one hand (most likely your dominant hand) clockwise to create an X and continue to twist about 8-10 times to create a series of tiny twists in the middle of the thread loop. These twists will catch your hair to remove them from the root.

6. Hold the thread with your index finger and thumb, one on either side. When you’re ready, place the thread on the surface of the skin where you’re ready to start removing hair follicles.

7. Open the fingers of your dominant hand. As you expand your hand, the other side will close in a see-saw motion. This movement slides the twisted middle part of the thread, gripping and removing hair as it moves. Make sure you’re removing the hair in the opposite direction of the way it grows.
8. Then, without the thread on the surface of your skin, expand the fingers on the other side to bring the twists back to the middle.
9. Repeat steps 6-7 as needed.
10. Finish by applying a nourishing moisturizer or oil to soothe the skin.
You may experience slight redness after threading, but it shouldn’t last more than an hour or two. Everyone’s pain tolerance is unique, so start with a small area to see if this works for you. Remember, your skin will get used to it, and the more you do it, the less painful it’ll feel. While hair growth can vary, I usually re-thread every 2-3 weeks.
Illustrations by Megan Badilla