

Make Your Locks Look Thicker with This Easy Hair Tutorial
Published Jan 29, 2014


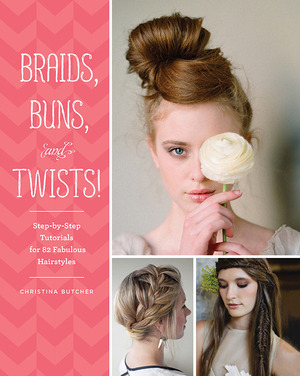
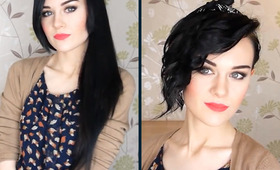
When we came across Braids, Buns, and Twists!, a new book filled (seriously, there are 82 tutorials) with ideas and clear step-by-steps for each, we knew our ongoing hunt for hair inspo was over—or at least on hold, for a moment. The author is Christina Butcher, a self-taught hair guru and blogger behind Hair Romance, who’s based in Sydney, Australia. Everyday, Butcher shares cute hairstyle ideas via photos, illustrations, and videos—all of which are easy to do on your own. “If I can do it, you can, too. Just give yourself enough time to practice, so when you’re actually in a rush out the door, you’ll get it right,” says Butcher. We had the opportunity to chat with the self-made stylist about her product must-haves and tips and tricks she’s learned over the years. Plus, we share one of our favorite tutorials from her book, the Scarf Braid—a quirky take on a much-loved classic ’do. The style makes your hair appear thicker than it actually is—score.
3 Questions with Author Christina Butcher

Say you’re going out, a little dressed up, and your hair just isn’t cooperating, and you have five minutes before you have to walk out the door. What do you do?
Grab some dry shampoo and spray it on your roots and a little on the mid-lengths of your hair to add texture. Lightly brush, or just run your fingers through, and gather all of your hair into a top knot or low messy bun. There’s something so chic about a messy updo with a glamorous dress. Add a bright lip and you’re all set.
What’s the best hair tip or trick you’ve learned recently that we may have never heard of?
Don’t open your bobby pin, just push it into your hair when doing an updo. A bobby pin can only hold a certain amount of hair and if you open it too much, you let too much hair inside. That can cause it to get too loose, and it might fall out during the day. Instead, just push the pin in with the bent arm face down (the little opening will make sure you catch the right amount of hair) and twist it up—this helps it stay put.
**What are your product must-haves? **
It’s worth investing in a good shampoo and conditioner for your hair type. Personally, I love sulfate-free formulas because they don’t dry out my hair. For styling, I like dry shampoo to add texture to clean hair, or just to use to refresh second-day hair. I’m also into trying hair masks—my hair needs some sort of treat after all the styling I do!
You Will Need
- hair elastic
- fabric scarf of your choice
- hair brush
Notes: If you have a longer scarf, you can tie it around your head as a headband first before adding it to your braid. You can also add a scarf into any braid to make your hair look thicker. Try it in a braided bun, a crown braid, or Heidi braids.

Step 1: Brush your hair back into a ponytail and secure with an elastic.
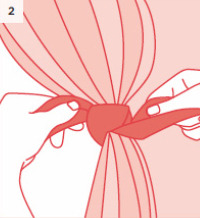
Step 2: Tie your scarf around the base of your ponytail.
Step 3: Split your ponytail into two equal sections and use the scarf as the third section in your braid.

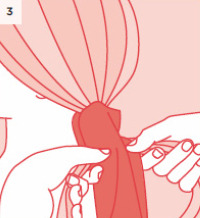
Step 4: Cross the left over the middle, and the right over the left (now middle), and continue braiding all the way down.

Step 5: Secure the end of your hair (and scarf) with an elastic.
Tip: If using a square scarf, fold it in half to form a triangle, and then continue folding it over to create a long ribbon. Tie it to the base of your ponytail with the loose end underneath so it won’t show. Make the scarf the center section of the braid. If your scarf is too long, you can tie it into a bow at the end of your braid.
Good Molecules: See a difference in your skin


You Might Also Like
-

Hair
The Secret to Kate Middleton's Shiny Hair
-
Eyes
Beautylish Social Experiment
-

Hair
Jennifer Aniston Goes Brunette For "Horrible Bosses"
-

Hair
Lily Collins' 2011 MTV Movie Awards Beauty Look
-

Hair
DIY Beauty: Hair Rinse
-
News
Is That Really True? We Investigate Common Beauty Myths
-

Hair
Best Celebrity Hairstyles
-
Community
An Easy Updo For Long Hair