

The rain can be beautiful, romantic, even a blessing, but not so much for our hair. Nothing is more frustrating than finishing the perfect look only to walk outside and end up a total mess. But rain doesn’t have to put a damper on looking fabulous—all you need is a ’do that can hold up against it. That’s why we’re sharing four simple hairstyles that can stay chic through spring showers; only 34 days until summer officially starts!
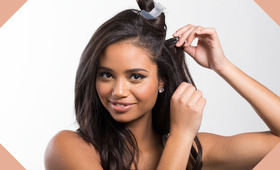
The fishtail braid

Pull your hair behind your shoulders and divide it into two equal parts. Next, take a small outer piece of one of the sections and cross it over to add it to the inside of the other. This will now become a part of that bundle of hair. Make the exact same cross again but this time you’ll use a piece from the opposite section of hair. Continue crossing small outer pieces of your hair over to the inside of the opposite section—the smaller the pieces, the more intricate the braid will look. Stop braiding when you have about 2 to 3 inches of hair left at the bottom. Secure with an elastic and you’re good to go.
More reading: See a classic fishtail tutorial here and how to do a side, messy version here.
Tousled ponytail

Backcomb the front and back sections of your hair and pull it back to a mid or low ponytail. Pull out a few of the front pieces and twist them around your fingers or a curling iron set on low heat for a messy-chic look. Work a few sprays of dry shampoo into the top of your pony to add some texture and to help get rid of any oily residue. Pick up your ponytail and slowly drop it as you lightly mist hairspray to add extra volume and help hold the look in place.
More reading: Find out the secret to getting height at the crown of your pony here.
Messy bun + headscarf

Start by pulling your hair into a loose ponytail. Don’t use a brush or worry about it looking perfect, as the style should have an effortless feel. Separate your tresses into three parts and teasing each one at a time (separating hair into sections makes teasing more manageable than trying to do it all at once). Next, wrap your teased hair around the base of your ponytail. Secure with bobby pins and you’ll have volume that can also take on the weather. Feel free to let any messy pieces fray around your bun for a slightly undone effect. Finish by wrapping your favorite head scarf around your ’do and tying it at the bottom of your neck or top of your head. This look is retro-chic and weather-approved!
More reading: To get an even messier big-hair bun, follow this tutorial.
Twisted bun

Start by parting hair down the center. Next, separate your hair into three sections, one on each side and another in the middle back, as you put it into one large braid. Clip the front two pieces out of the way. Gather the middle section of your hair at the nape of the neck and begin wrapping it clockwise into a low bun and secure with bobby pins. Unclip one of the front sections, and begin twisting it along the side of your head and down behind your ear; repeat on the other side. Wrap the ends of each section around the first bun you made (in the back) and secure them in place with bobby pins. Finish with hairspray to keep everything in place, rain or shine.
More reading: For another twist on a twisted updo, check out the Back Row Blender how-to here.
-
Gift Guides
- 230
-
Bath and Body
- 174
Good Molecules: See a difference in your skin
New Arrivals
-
Nudestix Nude Beach 6-Piece Eye Pencil Palette
$69
-
Danessa Myricks Beauty ColorFix 24-Hour Cream Color Matte Sundaze
$20
-
Danessa Myricks Beauty ColorFix 24-Hour Cream Color Matte Oasis
$20
-

Danessa Myricks Beauty ColorFix 24-Hour Cream Color Matte Dreamsicle
$20
-
Danessa Myricks Beauty ColorFix 24-Hour Cream Color Matte Bunny
$20
You Might Also Like
-

Shampoo
Brighten Up Your Hair Color
- 179
-

Hair
Waterproofing Your Hair
- 68
-
Hair
Milan Fashion Week, Fall 2011: Sleek Center Parts at Versace
- 6
-
Hair
Would You Rock Visible Bobby Pins?
- 43
-

Hair
Lovely Styles For Long Locks
- 295
-
Conditioner
How Often Should You Condition Your Hair?
- 220
-

Hair
What Makes A Haircut Good?
- 369
-
Hair
Easy Night-Out Hair Idea: Add Length Instantly, Wear it Down
- 409