

Easy Night-Out Hair Idea: Add Length Instantly, Wear it Down
Published Mar 29, 2014


Some people—particularly those with fine locks—have a hard time growing their hair past a certain length. For those of us who hit that wall, there are now a number of ways to get the look of luscious locks even beyond traditional extensions. You know, toss-over-your-shoulder hair that’s thick, healthy, and shiny (pretty much what everyone dreams of). With the help of clip-in extensions, you can add volume and inches—at home—in a matter of minutes. And celebrity hair stylist Creighton Bowman taught us how, step-by-step. Whether you’re looking for a hair makeover or an easy but fun ’do for a night out, clip-ins are such a cinch to do. You’ll master this tutorial in no time!
But first things first: what are clip-in extensions, exactly? You can get them at any beauty supply store, and most come in sets of “tracks” in different sizes, all of which you wear together, at the same time. Each track comes attached to a thin, net-like strip with clips, which you secure into your natural hair close to the scalp.
When it comes to selecting clip-ins, Bowman says human hair is preferable. “It’s higher-quality,” he explains, which of course means natural hair pieces will be more expensive than synthetic ones. Regardless of the type you choose, you want to match the color and texture to your natural locks. In the store, hold a piece near your head to see if it blends in with your hair color, especially the middle and end pieces (you don’t want to match them to your roots, because they’re usually always darker than the rest of your hair). Bowman says it’s helpful to style the pieces—curling or straightening, for instance—before putting them in, because it’s easier when they’re right in front of you. Once you’ve found the right extensions, start with clean, dry, styled hair and follow along.
You Will Need
- clip-in extensions
- hair clips
- optional: curling iron & flat iron
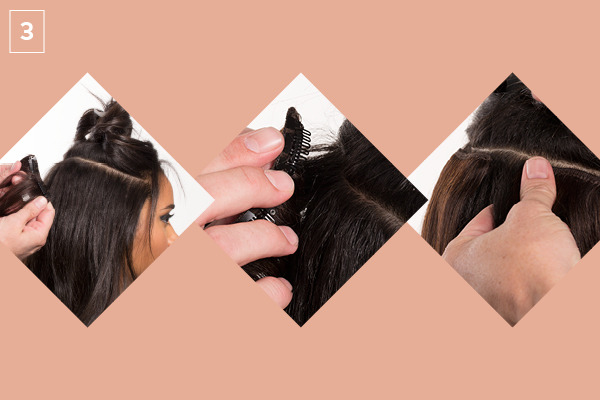
1: Separate your hair into two sections, one upper, one lower. You want to start parting your hair at one ear, cutting across the back of your head in a straight line to your other ear as pictured. Clip the hair in the upper section out of the way.

2: Each track is attached to a net with clips; make sure they’re all open. Take the largest track and line the top part of the netting up to your hairline (as pictured). It should cover your entire head from ear to ear. Once it looks even, push down and press it into your hair until you hear a “click.” Continue across the back hairline until the track is fully clipped in. Brush some hair down from the upper section over the track.

3: Right on top of the first (largest) track you just placed, add another layer of extensions. This time, you’ll place smaller tracks side-by-side across the hairline, as pictured. Here we used three smalls to wrap all the way around the head.
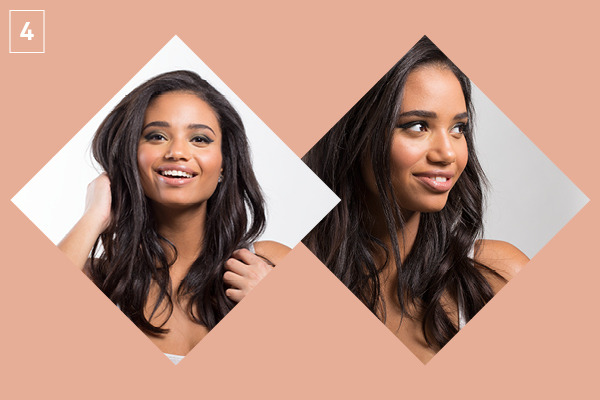
4: Brush the remaining hair from the upper section down and style as you wish. The clip-ins should be pretty much undetectable, especially after you brush or run your fingers through. Add any finishing touches to your style to make it all blend together!
Good Molecules: See a difference in your skin


You Might Also Like
-
Eye Shadow
Inglot's Smoky Eye Tips
-

Hair
Decoding Hair Product Types
-

Tips & Tricks
Online Beauty Lingo for Beginners
-

Lips
Tutorial: Fall's Dark Lip
-

Hair Color
A Beauty Editor's First Dye Job!
-
Hair
Jil Sander Hair, Milan Fashion Week
-
Hair Tools
New Paul Mitchell Express Mini Hair Straightener
-

Hair Tools
Big Sexy Hair