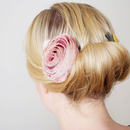
Named after the popular "Gibson girl" made famous by artist Charles Dana Gibson, the Gibson tuck was a popular way for women to style their hair in the early 20th century and is now back as an elegant red carpet favorite. We're happy to say that this Edwardian style is actually easier to create than you may think, and you can do it yourself in less than five minutes. Finer hair holds easier, but those with thick hair can still perfect the fold-and-tuck technique.
What You'll Need
-
Hair tie
-
10 to 15 bobby pins
-
Hair spray
-
Hair embellishments (bows, ribbon, flowers, headbands, or barrettes)
Step 1
CREATE THE PONYTAIL AND LOOSEN
Get rid of all knots and brush your hair into a neat ponytail between the nape and crown of the head. Secure the ponytail, then pull the elastic an inch or two from your scalp. Pull your hair apart above the elastic to create a pocket.

Step 2
FOLD THE HAIR
Flip over your ponytail and roll it into the pocket, as if you were rolling up a sleeping bag. Make sure you don't push the hair through the pocket or create uneven bulges.

Step 3
TUCK AND PIN
Hold the pocket with one hand as you begin pinning. Use bobby pins to secure the roll to your scalp, then affix a bobby pin horizontally right above the elastic to obscure it from view. Your tuck should feel as tight and secure as possible, so use as many pins as needed.

Step 4
BRAID LOOSE STRANDS
For those with long bangs or loose strands, incorporate small braids and twists into your design. On the right side, simply twist a loose strand until it's tight enough, then pin it near the pocket. On the left side, create a small braid and pin it near the tuck as well.

Step 5
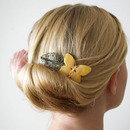
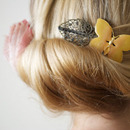
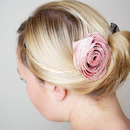
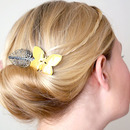
EMBELLISH AND DECORATE
Embellish your Gibson tuck with decorative pins, flowers, ribbons, or anything else you see fit. Accessories add a personal touch to any hairstyle and hide messy areas. We used embellishments inspired by the Victorian/Edwardian era, but you can use anything you choose. If you want a simpler style, ditch the barrettes and wear a cute headband instead.

Step 6
SEAL THE DEAL
Gently smooth out fly-aways and frizz, then finish the look with your favorite hair spray. Go out and show off your vintage style—no one will know it was so easy!

-
Gift Guides
- 230
-
Bath and Body
- 174
Good Molecules: See a difference in your skin
New Arrivals
-
Nudestix Nude Beach 6-Piece Eye Pencil Palette
$69
-
Danessa Myricks Beauty ColorFix 24-Hour Cream Color Matte Sundaze
$20
-
Danessa Myricks Beauty ColorFix 24-Hour Cream Color Matte Oasis
$20
-

Danessa Myricks Beauty ColorFix 24-Hour Cream Color Matte Dreamsicle
$20
-
Danessa Myricks Beauty ColorFix 24-Hour Cream Color Matte Bunny
$20
Featured Products
Featured Brands
You Might Also Like
-

Expert Advice
Winter Tips for Curly Hair
- 284
-
Makeup
How Do You Use Highlighters?
- 352
-
Makeup
Fast Fix Makeup Tricks
- 2834
-
Tutorials
How to Tightline Eyes
- 4197
-

How-to
How To Look Your Best In HD
- 667
-

Tutorials
Back to School Makeup
- 275
-

Hair
DIY Hair Care From Your Pantry!
- 1115
-
Tips & Tricks
5 Clever Non-Beauty Uses For Your Products
- 473