- NEW: Earn free store credit with Beautylish Rewards.
- Ship To: | EN
-
Contact Us

Our customer service team in the US is ready to assist you.
Monday - Friday
7 AM – 4 PM PTSaturday
7 AM – 4 PM PT
- Login
- Join
- Your Bag 0

Our customer service team in the US is ready to assist you.
Monday - Friday
7 AM – 4 PM PT
Saturday
7 AM – 4 PM PT


Jun 28, 2011
Amy L.
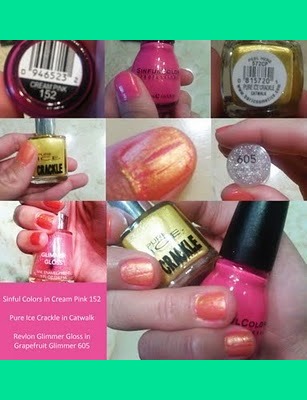
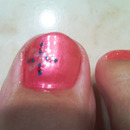
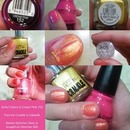
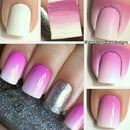
I remember the day when crackle was introduced by CoverGirl (about 12 years ago, middle school days) and it was a major disappointment. It certainly didn’t “crackle” and resulted in an ooey-gooey mess on your nails. Seeing OPI reintroduce it into the beauty scene this year left me skeptical. It didn’t work then, why would it work now? Especially at five more dollars a bottle than its predecessor. After seeing reviews and tutorials on Beautylish of OPI’s Crackle, it appeared to be working, so I thought I’d give it another shot. I tried Pure Ice’s Crackle though instead, it’s only $3.99 a bottle at Walgreens and I truthfully did not want to spend eight dollars if it was not going to work. Pure Ice did the trick and actually provided a nice crackle effect. Below is a little step by step walkthrough for applying, as it can be tricky!
I started out by applying one coat of Sinful Color’s Cream Pink (my new favorite color). After the paint dried, it only takes a minute or two, I applied one coat of Pure Ice’s Crackle in Catwalk. When you apply, you need to make two extremely quick strokes on your nail. Do not go back over what you have already applied and only apply one coat. Don’t worry if it looks a little messy, once it cracks you won’t notice. Also, I did not go all the way to the corners/sides of my nails. I found out upon testing that this creates a mess when it cracks there and does not look good. Allow for you base color to create a side border. Let the crackle dry for at least 10 minutes. It’s tacky for awhile and takes some time to harden. After it has hardened a good amount, I applied Revlon’s Glimmer Gloss in Grapefruit Glimmer as a top coat. This works well because it is clear, but has a hint of pink glitter. The crackle effect tends to result in a dull color and the Glimmer Gloss brightens it up! The Glimmer does not take long to dry. Good luck dolls and Happy Crackling!